Posted: Wed Jun 29, 2005 9:31 am Post subject: Eliminating background inside a photo or logo
I know how to eliminate a background and basically make it become nothing, so the main parts of a photo show up in another layout application, such as Qwark. I understand the process of selecting the inverse, using work paths, and clipping paths to achieve this, but my problem is when there are parts of a photo or a logo that is entirely surrounded by parts that I wish to keep, but I ALSO WANT this internal segment or group of separate segments, like inside letters (like a letter "o" or "A") to also be eliminated and go to the backrgound of nothing. Instead I am finding myself actually coloring these in to match an existing backround color in CMYK, and it never seems to be quite right, and it shows up in the finished product being somewhat off. If I could have a technique to eliminate these internal areas, just like I do the exterior areas around a photo, all at one time, or in a series of layered steps, I would appreciate knowing how to do this. I appreciate any time and detail you can give me.
I think I understand what you're saying. You want to know how to cut shapes out of a clipping path, like the hole in the middle of an O, right?
It's not difficult once you know how. Make your outer path, set it to a clipping path, etc. Now, on the same path (either the working path or the clipping path), use the pen tool to make the cutout path.
Now select that cutout path with the Arrow tool and click the Subtract button (I think that's what it's called) near the top left of the screen. After doing this, shift-click both paths with the Arrow tool and press Combine. The path on the inside should cut out of the one on the outside.
If I remember correctly, you can also do this another way. Just make the first path going in one direction, and then make the cutout path going in the opposite direction (as in, clockwise or counter-clockwise).
Hope this was helpful! If this was confusing, let me know. _________________ Interested in showcasing your special effects or learning some new ones from the masters? Check out PSFX!
Maybe I am thick, but it is not working here. Also, in many of these, I have several separate areas yet to remove. Here are the steps I use to remove an outer border, so just the object of interest in a photo or logo shows up, and the background becomes whatever the rest of the layout is set up to be.
1. Click Background tool
2. Select Inverse
3. Right Click and Make Work Path
4. Left Click on Work Path in Path Pallette and Save as Path 1
5. Then go 2 tabs over to the right to manipulate it, and select CLIPPING PATH
6. Save as an .EPS file in Photoshop. EPS options include Transfer Function to layout.
Now, without losing that progress, I now want to remove other sections (INSIDE WHAT REMAINS) that I have filled with a supposedby matching background color (but in reality it isn't). I would like to additionally remove those areas just like I removed the exterior background in the 6 steps above (or by some other method). As an example, in a block of text, some of the letters have exterior closed borders, like the letter "O", and I would like to make the inside of the "O" just be a nonexistent backround, just like the exterior of the rest of it. I am not sure the order of steps, what to save each part in - .EPS or .TIF, which steps to do first, and so forth - my worry is that I negate what whas done and started right when I go to the next one. Please be very detailed and specific in a step by step manner. I am happy to call you, post an example anywhere you suggest. Thanks so very much for your kind and personal attention.
Mike reism@cox.net
First of all, you're not thick. Paths are counter-intuitive at first; it takes a while to get used to working with them. I'll use the attached images as examples. If I over-explain anything, I don't mean to sound patronizing and I apologize; I just want to make sure everything is understood.
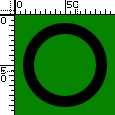
Let's say I want to take a black ring on a green background and replace the background with a red one. (First picture.) First, I'll make a red layer below the ring layer. Now I create the clipping path just as you've been doing. The ring is outlined with a path at this point, and because it's a clipping path, the red shows through. But there's still a green hole in the middle.
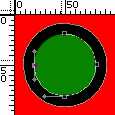
To get rid of the hole, we have to modify the clipping path. If the path itself isn't visible, start by clicking the clipping path in the Layers palette. Now you should see the gray circle around the ring. Click the Pen tool. If you're unfamiliar with it, this tool is used to create custom paths. Click at the top of the inner edge of the ring and drag horizontally. You should see a dot appear and a horizontal line through it. Let go of this and do the same thing at the right edge of the inner circle, but this time drag vertically. Then the same at the bottom edge, horizontally, and the same at the left edge, vertically. Now put the mouse over the starting point and click once. You should see a path that roughly conforms to the inner edge of the ring. Don't worry if it's not precise; this is just an example.
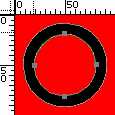
At this point, you should still be seeing the green background in the middle. To take care of this, you'll have to make this new path subtract from the old one. Click the Path Component Selection tool, which looks like a black arrow. Click once on the inner path. At the top left of the screen, you should see four square buttons right next to a button that says combine. Once you've selected the inner path, click on the button second from the left, the one that says "Subtract" if you hover your mouse over it. Tada! If all went well, you should see a sloppy but quite red hole in the middle. This technique can be applied to all paths, and it can be done multiple times. Just create more than one path and set all the "cut-out" paths to Subtract.
Again, let me know if this doesn't make sense or doesn't work. Good luck!
ring1.jpg
Description:
Filesize:
2.71 KB
Viewed:
2110 Time(s)
ring4.jpg
Description:
Filesize:
3.38 KB
Viewed:
2110 Time(s)
ring6.jpg
Description:
Filesize:
3.38 KB
Viewed:
2110 Time(s)
_________________ Interested in showcasing your special effects or learning some new ones from the masters? Check out PSFX!
Posted: Thu Jun 30, 2005 10:00 am Post subject: Not getting it
I can move the arrow tool around - all it seems to do for me is to move the image I am left with around - left or right a bit - the image has dots around the outline here and there. I probably need to watch you do this. I have PCANYWHERE if you want to try - also have a broad band connection in, and I can ip address you. My email is reism@cox.net. The files are large, like 15 meg in size, so not easily uploaded, unless you have an FTP site. Sorry to not get this - I am good with computers, but this one isn't getting through. I think there are a few steps I must be omitting that are instinctive for you, but not me. If I see it done once, I think I can get it.
Mike
actually if the text is a solid color like the black ring that Datameister used as
an example, you could just select it with the magic wand and select inverse it
to delete the background, you could also just select the background with the magic wand tool!
but ofcours this only works with solid colors else you will end up with a mess
Posted: Thu Jun 30, 2005 10:47 am Post subject: I don't think I can attach anything, but I will try
I will try to attach a logo I want to use - it has text and graphical elements.
I submitted a very small .JPG, just for an example. I want to keep everything that is black, but I want everything that is white, even the parts inside the 6-7 closed loop letters (also white) to be removed, so the background of any layout I set this on will show through, and only the black outlines will remain. Problems for me are the closed loop letters and also inside the house, where there are two black horizontal bars, that are to be retained. I don't know when to save what, the exact steps to do, which button to click and in which order, so I am not getting the results I should. I wish you could demo this for me on PCANYWHERE or something where I can watch this just once - then it would be clear to me.
SO SORRY.
Mike
PS - I would normally start all this off as a .TIF, and wind up with a transparent .EPS file. Never a .jpg - that is just to make this easier on line.
Equal Housing Border - mini.jpg
Description:
I would normally start all this off as a .TIF, and wind up with a transparent .EPS file.
Posted: Thu Jun 30, 2005 10:49 am Post subject: Followup
I can post much better quality copies than this - was just trying to keep the band usage to a minimum. I do apologize for my lack of skill in getting this. Once I do, I hope it will be like a light bulb turning on, because right now it isn't catching fire. My apologies for wasting your valuable time.
Mike
That's a very good point, Moi. For solid colors, that works just fine. I'd recommend that method if the picture you want to isolate is just comprised of flat colors.
I don't know a whole lot about PCANYWHERE and the other things you mentioned. I agree that the best way for you to learn this would be to see it done. I know I've had problems with other programs that seem like they should be so easy to fix, but no one seems to be able to explain what to do, step by step. If you can give me more details about this way for me to show you, I'll do my best to help.
And don't worry about not getting this. Nothing to apologize for. Photoshop doesn't have the easiest learning curve. _________________ Interested in showcasing your special effects or learning some new ones from the masters? Check out PSFX!
Posted: Thu Jun 30, 2005 11:13 am Post subject: Another comment
One place I am getting a response that stumps me, is when I select an internal area I want to remove. Right clicking on it gives a choice called
"Subtract from Selection." When I click on it, I get a warning window, that says, "No Pixels were selected." Maybe just getting through this hurdel will allow me to do the subtraction from the clipping path. Any thoughts or help, using the picture I attached as a sample guide, would be wonderful. Again, thanks so much.
Mike
You cannot post new topics in this forum You cannot reply to topics in this forum You cannot edit your posts in this forum You cannot delete your posts in this forum You cannot vote in polls in this forum You cannot attach files in this forum You can download files in this forum