|
|
| Author |
Message |
koyaanisquatsi
Joined: 12 Jan 2007
Posts: 13
|
 Posted: Fri Jan 12, 2007 12:58 pm Post subject: Customize actions? Use in curves and level adjustment Posted: Fri Jan 12, 2007 12:58 pm Post subject: Customize actions? Use in curves and level adjustment |
 |
|
I was wondering if it's possible to customize an action so that i can manipulate each file individually. What I'm trying to do is take a whole bunch of photos and adjust the curves and levels for each, then flatten the image and save as a jpeg. I once made an action with the liquify filter and I had to adjust the filter each time and I would like to do the same in this case. However, when I set up the action, the curves adjustment layer defaulted to the same settings as the first and just pumped through all my images without me being able to adjust them individually. Thanks for your help.
ps: I'm using CS1
|
|
|
|
|
 |
lasa

Joined: 08 Aug 2005
Posts: 1090
Location: Florida
PS Version: CS
OS: MS XP
|
| Posted: Fri Jan 12, 2007 6:25 pm Post subject: |
|
|
I think this is what you are looking for...
open your PS help..click SEARCH enter
INSERTING STOPS
Good luck,
Lasa
_________________
Lasa
My hobbie: www.angulo-webdesign-templates.threefooter.com
Treat people the way you want to be treated... |
|
|
|
|
|
koyaanisquatsi
Joined: 12 Jan 2007
Posts: 13
|
| Posted: Sat Jan 13, 2007 6:54 pm Post subject: hmmm... |
|
|
i tried that and it just stops the entire action after my stop message pops up. The only option to click is "stop" and that just stops my whole action midstream. from there all i can do is abort the whole batch or move on to the next image.
What i want to do is just have the image pop up with a curves adjustment box, manipulate it to my liking, then press ok and have it go through the rest of the action automatically. (flatten image, save) Like i noted before, that's exactly how it worked when i made an action with the liquify filter.
I am touching up large numbers of photographs and i'm trying to save myself a few keystrokes for each image
I noticed in the steps for my action, in the pulldown menu of "curves" it recorded all of the settings for that curve. Is there no way to set it up so that i can define those settings individually?
thanks for you help though
|
|
|
|
|
|
lasa
Joined: 08 Aug 2005
Posts: 1090
Location: Florida
PS Version: CS
OS: MS XP
|
| Posted: Sat Jan 13, 2007 7:29 pm Post subject: |
|
|
Take a look at this tutorial...read it thru the part you are interested in is near the end.
http://www.shutterfreaks.com/Tips/GettingStartedPS.html
Lasa
sample from the site: (see site for pictures)
"A Simple Example
For a (very) simple example, let's assume that you want to record an action that will resize a landscape-oriented photo for the web and sharpen it. Let's assume that you always want your photos to be 600 pixels wide, but that you want to control the amount of sharpening for each photo.
First, open a photo to work on.
If you don't want to put this action in an existing action set, create a new one (in this case, "PrepareForWeb").
Start recording your action (in this case, "LandscapePhotos").
From the main menu, use "Image/Image Size" to resize the photo and then use "Filter/Sharpen/Unsharp Mask" to sharpen it.
Stop recording.
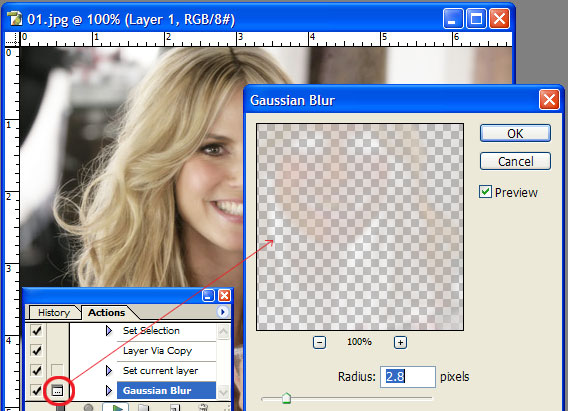
Your action now looks like this. Unfortunately, it always sharpens the same amount, and you wanted to be able to control the amount of sharpening for each photo. Here's where that rectangle to the left of the Unsharp Mask step will help.
Click the rectangle to the left of the Unsharp Mask step to put an icon in it, and the next time you run the action, it will show you the Unsharp Mask dialog, where you can set the amount of sharpening.
Notice that clicking the rectangle put a dark-framed icon beside the Unsharp Mask step, and it also put red-framed icons beside the action name and the action set name. A red-framed icon means that some, but not all, of the steps inside an action or action set will stop for user input.
When you're done with an action, it's a good idea to use the Actions Window menu to save a copy to your hard disk.
These are just the basics. For links to more information about Photoshop, check out our Links page"
|
|
|
|
|
|
koyaanisquatsi
Joined: 12 Jan 2007
Posts: 13
|
| Posted: Sat Jan 13, 2007 7:46 pm Post subject: |
|
|
that did the trick! thanks
|
|
|
|
|
|
lasa
Joined: 08 Aug 2005
Posts: 1090
Location: Florida
PS Version: CS
OS: MS XP
|
| Posted: Sat Jan 13, 2007 8:11 pm Post subject: |
|
|
Just did this before reading..your post...glad it worked for you..
I'll post it anyway..
Lasa
| Description: |
|
| Filesize: |
73.14 KB |
| Viewed: |
820 Time(s) |
|
|
|
|
|
|
|
|


