|
|
| Author |
Message |
prpleh4ze
Joined: 04 Jan 2009
Posts: 3
|
 Posted: Sun Jan 04, 2009 4:15 pm Post subject: Little help please Posted: Sun Jan 04, 2009 4:15 pm Post subject: Little help please |
 |
|
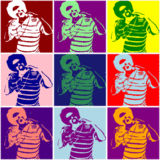
hey i've seen this type of picture around a lot, can anyone point me out to a tutorial on how to do this please? and is there a certain name for these types of pics? i would've used search but i dont know what to search. sry if its in the wrong section
| Description: |
|
| Filesize: |
15.75 KB |
| Viewed: |
258 Time(s) |
|
|
|
|
|
|
 |
moondog

Joined: 02 Apr 2008
Posts: 778
Location: Michigan
PS Version: CS2
OS: Vista
|
| Posted: Sun Jan 04, 2009 4:28 pm Post subject: |
|
|
when I was in photoshop class at the community college we referred to this as a 9-Square ... or 3 by 3.
however, that is more than likely NOT the name. I will look into this and get back with you on it.
It's not really hard .... so, bear with me.
_________________
moondog
Romans 10:13
For Whosoever shall call upon the name of the Lord shall be saved |
|
|
|
|
|
prpleh4ze
Joined: 04 Jan 2009
Posts: 3
|
| Posted: Sun Jan 04, 2009 7:24 pm Post subject: |
|
|
| moondog wrote: | when I was in photoshop class at the community college we referred to this as a 9-Square ... or 3 by 3.
however, that is more than likely NOT the name. I will look into this and get back with you on it.
It's not really hard .... so, bear with me. |
ok thanks for the help
|
|
|
|
|
|
Michelangleo
Joined: 31 Dec 2008
Posts: 22
Location: Huntington Beach, Ca.
|
| Posted: Sun Jan 04, 2009 11:39 pm Post subject: |
|
|
What you'll need to do it this:
Since you are working with two different sections (the two different colors), you need to make two "Layers" to help you out.
1) Select the areas in the picture that will be one color. Then hit "Shift-Ctrl-N" to make a new layer. Copy and paste your selection to the new layer.
2) Do the same to the other color area.
3) Now you should have 3 layers. Your original (which you can hide and use later if needed), and your two separate color layers.
4) Now that you have two layers you can use them to make the different colors.
5) Once you are satisfied with the colors, select both layers together and past them into a new (4th)layer. I'd recommend naming your layers so you don't get confused.
6) Then do that until you have your 9 boxes and arrange them how you like.
Enjoy!
If you have any other questions feel free to post them.
_________________
Genius is eternal patience.
-Michelangelo |
|
|
|
|
|
prpleh4ze
Joined: 04 Jan 2009
Posts: 3
|
| Posted: Sun Jan 04, 2009 11:50 pm Post subject: |
|
|
| Michelangleo wrote: | What you'll need to do it this:
Since you are working with two different sections (the two different colors), you need to make two "Layers" to help you out.
1) Select the areas in the picture that will be one color. Then hit "Shift-Ctrl-N" to make a new layer. Copy and paste your selection to the new layer.
2) Do the same to the other color area.
3) Now you should have 3 layers. Your original (which you can hide and use later if needed), and your two separate color layers.
4) Now that you have two layers you can use them to make the different colors.
5) Once you are satisfied with the colors, select both layers together and past them into a new (4th)layer. I'd recommend naming your layers so you don't get confused.
6) Then do that until you have your 9 boxes and arrange them how you like.
Enjoy!
If you have any other questions feel free to post them. |
hey thanks a lot man
|
|
|
|
|
|
eSeM
Joined: 05 Jan 2009
Posts: 18
|
| Posted: Mon Jan 05, 2009 3:12 am Post subject: |
|
|
|
|
|
|
|
|
|


