|
|
| Author |
Message |
Foxden Vixen

Joined: 23 May 2009
Posts: 9
Location: Parker, CO
|
 Posted: Sun Dec 20, 2009 11:17 am Post subject: Having problems with pen tool Posted: Sun Dec 20, 2009 11:17 am Post subject: Having problems with pen tool |
 |
|
I am trying to get used to Photoshop CS3 so that I am more marketable. I prefer Fireworks but not many places use it because they prefer Photoshop. I am working on a tutorial for a shiny button. I am to add a curved area using the pen tool. I don't even use the pen tool in FW. Here is the image showing how the curve should be done but I can't get it to work. Could someone please help me with the sequence of the points (i.e. first point left, second point left top or left bottom...the points are visible in the graphic included in the tutorial).
[/img]
| Description: |
|
| Filesize: |
60.91 KB |
| Viewed: |
254 Time(s) |

|
|
|
|
|
|
 |
Boo
Joined: 11 Apr 2008
Posts: 34
|
| Posted: Sun Dec 20, 2009 3:50 pm Post subject: |
|
|
You're not going to get a perfectly rounded curve that way.
First, create a new layer on top.
Then, choose the ellipse path tool which is just under the white arrow in the tools window. (By default I think it's a square-shaped tool, so click on it, hold it down and then the small sub-menu appears where you can then choose the ellipse tool.)
Then draw your circular shape (hold down shift while you do this) and make it the size you need it.
Then, stroke your ellipse path (or whatever you're going to do with it).
You should now have a full-circled shape.
Next, choose the eraser tool and make it a soft airbrush type. Just lightly erase the upper half of the circle you just stroked. As you do this you'll see the bottom half of your curve start to take place.
|
|
|
|
|
|
artd
Joined: 06 Sep 2009
Posts: 51
|
| Posted: Sun Dec 20, 2009 4:52 pm Post subject: |
|
|
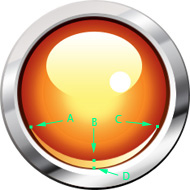
Hi Foxden Vixen,
Well, to answer your question directly, I'd probably start with the top left point and move to the right, then back to the left for the bottom curve. But actually, I really don't see what difference it would make :-)
Boo's method may work well for you. If you'd rather do it with the Pen Tool however, try doing it this way:
1) Take the Pen Tool and click on point A (attached image) and release the mouse button.
2) Click on point B (do not release the mouse button) and drag to your right until the left part of the upper curve is correct. Your two direction lines should be perfectly horizontal. If they're not, lengthen or shorten
them until your curve is correct and the lines are perfectly horizontal. Now release the mouse button.
3) Click on point C. Hold and drag up and to your right (lengthen or shorten the direction lines as necessary) until the right half of the upper curve is correct. Your two direction lines should be at about 45 degree angles.
4) While holding the alt/opt key down, click on point C. This will remove one of the direction lines converting it from a smooth point to a corner point. This is necessary because you're going to change directions suddenly.
5) Click on point D. Hold and drag to your left until the right half of the lower curve is correct. Your two direction lines should be perfectly horizontal.
6) Click on point A. If your direction lines in step 5 were perfectly horizontal, the left half of the lower curve will probably compete automatically. But to make sure, keep the mouse button down and if necessary, drag until it is correct, then release the button.
Hope this is helpful,
Art
| Description: |
|
| Filesize: |
40.93 KB |
| Viewed: |
235 Time(s) |
|
|
|
|
|
|
|
hawkeye
Joined: 14 May 2009
Posts: 2377
Location: Mesa, Az
OS: Windows 7 Pro 64 bit
|
| Posted: Sun Dec 20, 2009 5:11 pm Post subject: |
|
|
Good guide artd.
The only thing I might add is to use a vertical guide to help place points B & D and a horizontal guide for points A & C.
The pen tool is difficult for most people to master, but it's extremely useful and well worth the effort.
|
|
|
|
|
|
artd
Joined: 06 Sep 2009
Posts: 51
|
| Posted: Sun Dec 20, 2009 5:48 pm Post subject: |
|
|
Good idea hawkeye! I agree about the Pen Tool, it really is an extremely useful tool and I think it's fun to work with! In my example, actually the entire upper curve can be done without even using point B :-)
Art
|
|
|
|
|
|
Foxden Vixen
Joined: 23 May 2009
Posts: 9
Location: Parker, CO
|
| Posted: Tue Dec 22, 2009 9:50 am Post subject: |
|
|
Thank you for your responses...I will give this a try and see how well I do. I know I need to master the pen tool in both PS and FW.
|
|
|
|
|
|
Foxden Vixen
Joined: 23 May 2009
Posts: 9
Location: Parker, CO
|
| Posted: Tue Dec 22, 2009 10:04 am Post subject: |
|
|
Thank you artd....it took a couple of times to get it just right but it worked!!!! The pen tool is interesting and I will look for more tutorials on how to use it.
|
|
|
|
|
|
hawkeye
Joined: 14 May 2009
Posts: 2377
Location: Mesa, Az
OS: Windows 7 Pro 64 bit
|
| Posted: Tue Dec 22, 2009 10:59 am Post subject: |
|
|
To speed workflow when using the pen tool:
Hold down the ctrl key to temporarily change to the direct selection tool to move a point. Hold down the alt key to change a point type (curve/straight)
|
|
|
|
|
|
Patrick
Administrator

Joined: 14 Feb 2003
Posts: 11945
Location: Harbinger, NC, U.S.A.
|
| Posted: Tue Dec 22, 2009 11:33 am Post subject: |
|
|
|
|
|
|
|
|
|


