|
|
| Author |
Message |
robdude
Joined: 11 Nov 2011
Posts: 3
|
 Posted: Fri Nov 11, 2011 6:49 am Post subject: Beginner CS5 User Here - Trouble With Selections... Posted: Fri Nov 11, 2011 6:49 am Post subject: Beginner CS5 User Here - Trouble With Selections... |
 |
|
So I've got a trial of Photoshop CS5 - everyone says Photoshop is the thing to use so I'm trying to learn the basics.
I'm trying to make a simple picture frame on one layer with transparency in the middle and the actual photo in a lower layer.
I've got the 'frame' layer all filled in as 'yellow' right now and I used the selection tool to get the correct shape I want for the frame, then I inverse my selection and hit 'delete' so that the middle will be clear and show the picture below.
The problem is that it goes well past my selection! It's like it's doing some sort of auto-smooth or something; but it's messing everything up  Is there any way to select *exactly* what is selected, and not a pixel more? Is there any way to select *exactly* what is selected, and not a pixel more?
Last edited by robdude on Fri Nov 11, 2011 7:40 am; edited 1 time in total |
|
|
|
|
 |
robdude
Joined: 11 Nov 2011
Posts: 3
|
| Posted: Fri Nov 11, 2011 6:59 am Post subject: |
|
|
I hope this will help you understand the problem....


|
|
|
|
|
|
thehermit
Joined: 05 Mar 2003
Posts: 3987
Location: Cheltenham, UK
|
| Posted: Fri Nov 11, 2011 9:52 am Post subject: |
|
|
Make sure you are not feathering your selection. Right click whilst on a selection tool and check.
_________________
If life serves you lemons, make lemonade! |
|
|
|
|
|
robdude
Joined: 11 Nov 2011
Posts: 3
|
| Posted: Fri Nov 11, 2011 11:27 am Post subject: |
|
|
| thehermit wrote: | | Make sure you are not feathering your selection. Right click whilst on a selection tool and check. |
When I have the selection tool active there is a textbox at the top of my screen that says 'Feather:' and the box has '0 px' inside of it.
If I right click and select 'Feather...' it won't let me put 0 in the box, instead it tells me the minimum is 0.2 pixels.
I've set it to the minimum, but I'm still getting the very blurry edge.
|
|
|
|
|
|
renata
Joined: 26 Nov 2010
Posts: 368
Location: Australia
|
| Posted: Fri Nov 11, 2011 1:55 pm Post subject: |
|
|
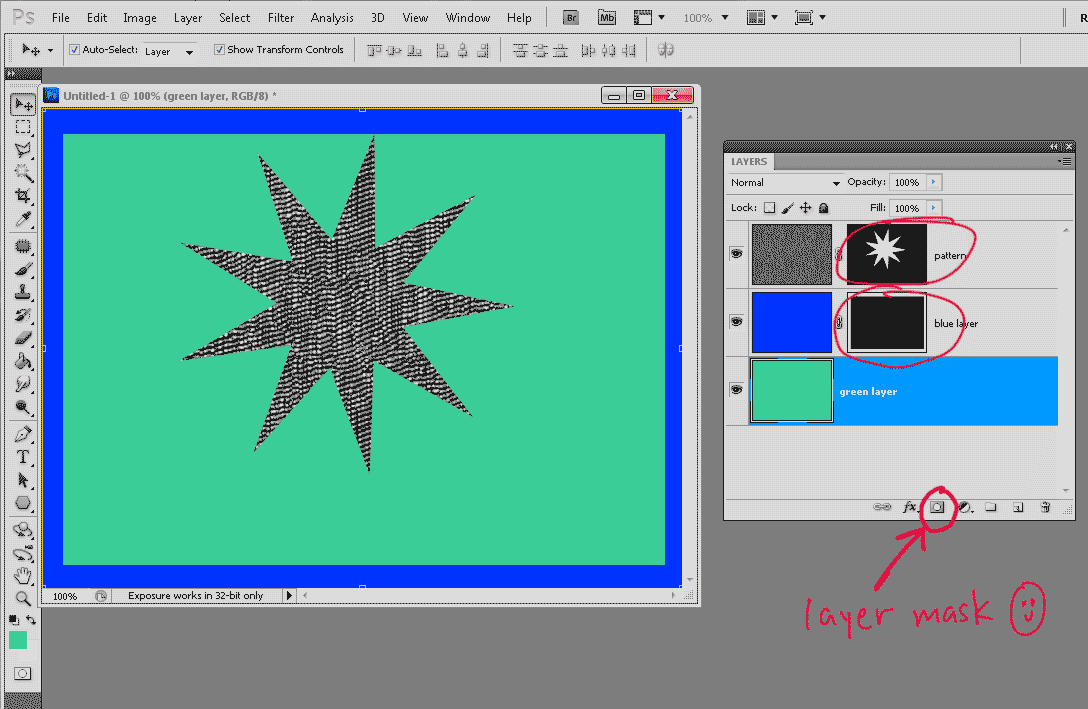
In your diagram, your selection has rounded edges. If you're using the ordinary marquee with a Feather of 0px, then it would definitely have square edges and no transparency.
There's another really useful way to make an edge which give you a lot of versatility and is really worth taking the trouble to learn, and I'll explain why later. This method is to use masking.
If you look at the bottom of the layers panel, there's a square with a circle on it. If you click on it, it adds a layer mask to the current layer. Now, here's the nice bit. When you paint on the layer mask in black and white, you'll find that anything black is hidden, anything white will show.
So, for you, if you add a layer mask to your frame layer and draw a black rectangle in the middle of the mask, then the white outer edges will show up as a frame. Click on the mask when you want to change what's hidden/visible in the main layer. Click in the main layer to adjust the actual content of the layer (e.g if you want to change the color, add a gradient, texturize it etc).
[Note: to add mask to background layer, double click on background layer first to convert it to a "normal" layer].
But the reason that this is worth learning is that you can now make lots of changes to your frame. Would you like to scruff the edges? No worries, get a scruffy brush and scruff the edges. Honestly, it's so much fun. If you make a mistake, paint back over it black.
But if you don't have time for that right now, double check your feather. OR - one more way (there are probably hundreds) - did you know that you can adjust the canvas size (see image>canvas size, choose relative and pick a color).
OR - (sorry the morning coffee has just hit and made my hyper!) - click the layer (convert to ordinary layer if it's a background layer) and choose edit>stroke. Choose "inner" and a fat radius, select your color and it will make a nice sharp edged frame for you. I do this a lot (in white) to make a quick 'snapshot' effect on a photo.
Er, better stop now or you'll think that this forum contains crazy people, but let us know how you go!
| Description: |
|
| Filesize: |
45.85 KB |
| Viewed: |
584 Time(s) |
|
|
|
|
|
|
|
thehermit
Joined: 05 Mar 2003
Posts: 3987
Location: Cheltenham, UK
|
| Posted: Fri Nov 11, 2011 4:03 pm Post subject: |
|
|
Nice explanation and demo renata!
_________________
If life serves you lemons, make lemonade! |
|
|
|
|
|
thehermit
Joined: 05 Mar 2003
Posts: 3987
Location: Cheltenham, UK
|
| Posted: Fri Nov 11, 2011 7:42 pm Post subject: |
|
|
We still have the selection issue though! 
_________________
If life serves you lemons, make lemonade! |
|
|
|
|
|
renata
Joined: 26 Nov 2010
Posts: 368
Location: Australia
|
| Posted: Sat Nov 12, 2011 12:48 am Post subject: |
|
|
Yes, I can't work it out. To me, it definitely looks feathered and I can't think what else could do that...
|
|
|
|
|
|
renata
Joined: 26 Nov 2010
Posts: 368
Location: Australia
|
| Posted: Sat Nov 12, 2011 1:14 am Post subject: |
|
|
So now you've got me puzzling over this, Mr Hermit! robdude, you say that you "inverse the selection and hit 'delete' so that the middle will be clear".
I'm unclear why you need to inverse the selection before deleting it. Are you not just drawing a marquee in the middle then hitting delete?
|
|
|
|
|
|
thehermit
Joined: 05 Mar 2003
Posts: 3987
Location: Cheltenham, UK
|
| Posted: Sat Nov 12, 2011 4:17 am Post subject: |
|
|
I too am interested in how you are getting rounded corners in your selection? If you make a new channel and fill it with your selection shape, does it come out blurry?
_________________
If life serves you lemons, make lemonade! |
|
|
|
|
|
|


