|
|
| Author |
Message |
decodonn
Joined: 21 Feb 2012
Posts: 4
|
 Posted: Tue Feb 21, 2012 1:10 pm Post subject: Does anyone know what this effect is????? Posted: Tue Feb 21, 2012 1:10 pm Post subject: Does anyone know what this effect is????? |
 |
|
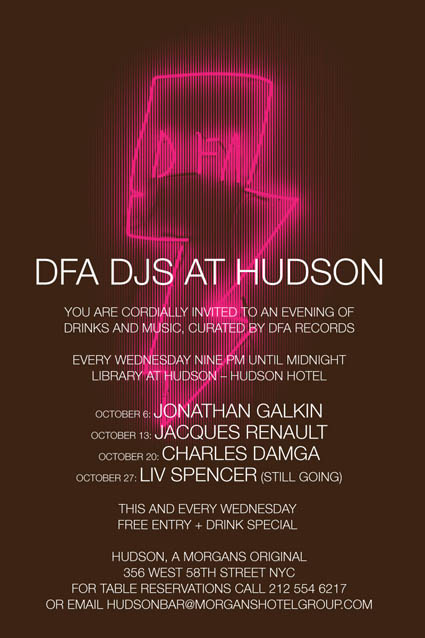
Hi guys, desperately trying to find out how to do this effect on the pink sketch in the background of this image. it looks like an outer glow of some sort but there is a grain or comb effect overlayed onto it. I cannot find anything like this anywhere and have tried multiple layers to try and build it up but i suspect there is a comb effect somewhere that i cannot find. Does anyone have the answer???!!!!!!!!!!!!! Any advice would be much appreciated as this is driving me crazy.
cheers
D
| Description: |
|
| Filesize: |
72.88 KB |
| Viewed: |
555 Time(s) |
|
|
|
|
|
|
 |
thehermit
Joined: 05 Mar 2003
Posts: 3987
Location: Cheltenham, UK
|
| Posted: Tue Feb 21, 2012 3:31 pm Post subject: |
|
|
Looks like an RGB scanline effect with a neon over the top. Will have a little look and report back. Hope someone gets here before me! 
_________________
If life serves you lemons, make lemonade! |
|
|
|
|
|
Auieos
Joined: 29 Jan 2010
Posts: 2019
|
| Posted: Wed Feb 22, 2012 1:18 am Post subject: |
|
|
*cuts in front of Mike*
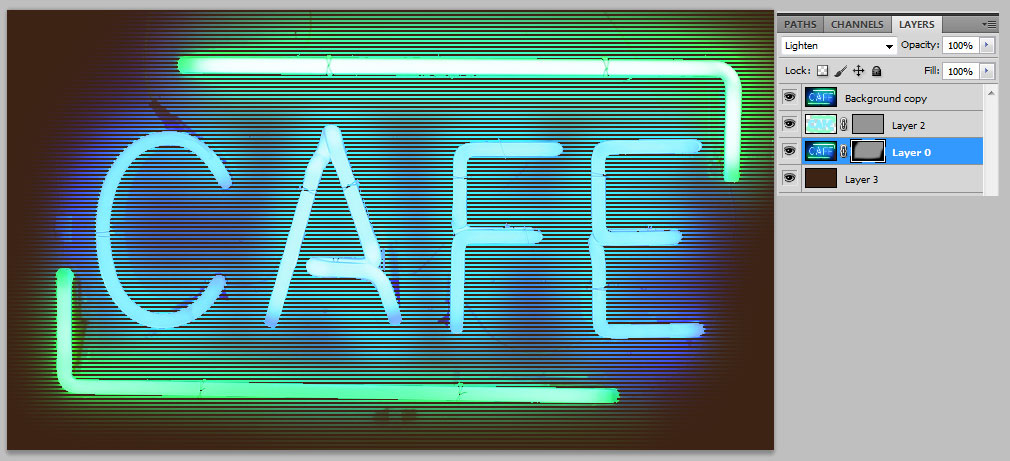
Here is kind of the same look, horizontal lines because i was to lazy to make a new pattern.
Opposite layer masks on layers 0 & 2 of 2px lines
layer 2 blend mode is overlay
layer 0 blend mode is lighten
background copy layer: inside <blending options> the 'blend if' grey 'this layer' black point has been raised so only the brightest part of the neon is visible.
| Description: |
|
| Filesize: |
121.24 KB |
| Viewed: |
539 Time(s) |
|
|
|
|
|
|
|
decodonn
Joined: 21 Feb 2012
Posts: 4
|
| Posted: Wed Feb 22, 2012 4:22 am Post subject: |
|
|
Thanks a lot Auieos....im nearly there...
im trying the clipping masks but cant get the option for a 2px line mask. Am I doing something stupid?!! ( I am almost sure that I am!)
ps I am using CS3 if that makes a difference?
if you can let me know how to do the opposite layer mask with the 2px line option then I'm sure I can take it from there....but I just cant find it.
any help greatly appreciated, this has been driving me crazeeeeeeeee
D
|
|
|
|
|
|
thehermit
Joined: 05 Mar 2003
Posts: 3987
Location: Cheltenham, UK
|
| Posted: Wed Feb 22, 2012 7:58 am Post subject: |
|
|
| Quote: | | i was to lazy to make a new pattern |
Or rotate the canvas?
Really nice effect Auieos, high standard as always.
@ decodonn, I'm a little baffled by the explanation too, so I guess the question is how are the scan lines created Auieos?
_________________
If life serves you lemons, make lemonade! |
|
|
|
|
|
decodonn
Joined: 21 Feb 2012
Posts: 4
|
| Posted: Wed Feb 22, 2012 11:41 am Post subject: |
|
|
exactly. i cant figure out how to do the scan lines. i think its a mask or clipping layer, but i cant see the option to mask a particular pattern (as in this case a line pattern....) so i am a bit stuck.
any help of course appreciated. i am sure this man has the answer 
thanks for your help so far.
D
|
|
|
|
|
|
Auieos
Joined: 29 Jan 2010
Posts: 2019
|
| Posted: Wed Feb 22, 2012 10:45 pm Post subject: |
|
|
lol thanks Hermit, and yes, rotate canvas I should have.
Yeah sorry for the lacking explanation I was doing two things at once yesterday.
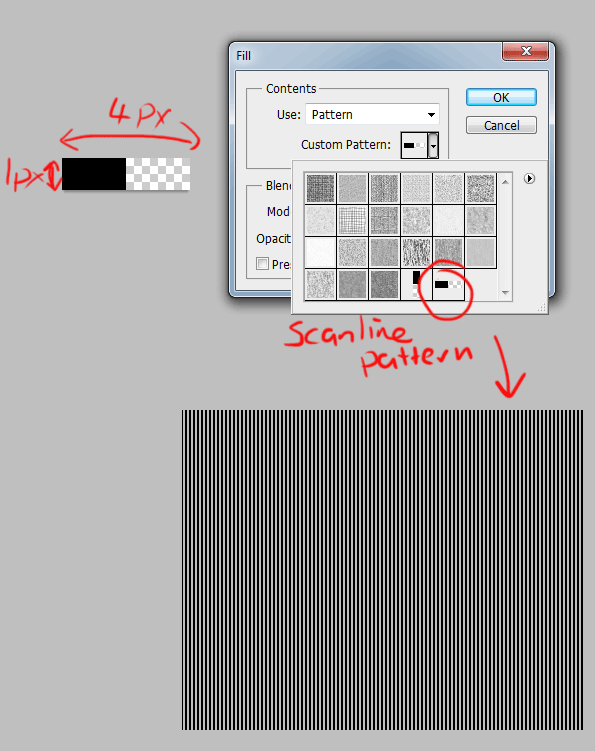
To make the scanlines create a new document 4px width 1px height, and fill 2pixels black with the pencil tool, leave the other 2 transparent.
Then go up to the menu 'Edit > Define Pattern' and this will add that as a new pattern.
Now you have this, highlight the appropriate layer mask on your neon sign document and use 'Edit > Fill > Use: Pattern' and select the new pattern to fill it.
This will give you the scanline effect.
To get the inverse pattern, ctrl+click the layer mask that has your existing scanlines on it. This will create a selection of them.
Then go to menu 'Select > Inverse' which will invert the selected pixels.
Now you can click the add layer mask button on you other layer.
Inverted scanlines will be created because Photoshop will automatically mask out areas not encompassed by a selection.
Hope i haven't explained it too confusingly, once you get it I'm sure it will become second nature.
Also i forgot to mention that on layer2 of my document i used the eyedropper tool to get the color of each neon and then a soft brush to make the haze.
| Description: |
|
| Filesize: |
23.43 KB |
| Viewed: |
507 Time(s) |
|
|
|
|
|
|
|
decodonn
Joined: 21 Feb 2012
Posts: 4
|
| Posted: Thu Feb 23, 2012 4:53 am Post subject: |
|
|
Auieos, i am forever grateful! thanks for everyones help, i can sleep again at nights now.
that was perfect, ive managed to pull it all together, great little tutorial. thanks again
D
|
|
|
|
|
|
Auieos
Joined: 29 Jan 2010
Posts: 2019
|
| Posted: Fri Feb 24, 2012 7:20 am Post subject: |
|
|
Hey no worries. Glad we could help you out and you got it solved.
|
|
|
|
|
|
|


