|
|
| Author |
Message |
jtt89
Joined: 01 Mar 2012
Posts: 11
|
 Posted: Thu Mar 01, 2012 10:21 am Post subject: How to change the backround stripes from green to pink? Posted: Thu Mar 01, 2012 10:21 am Post subject: How to change the backround stripes from green to pink? |
 |
|
http://belerosemedia.com/header.jpg
I know it is quite easy to do in Photoshop, but I forgot how to do this. I want to replace green backround in the top image to darker and lighter pink stripes to match the color of the website. Can you tell me how would you do that (step by step, if possible, to avoid confusion).
Thank you
# # #
I've been going in the direction of:
1) Select color range (Pick green and just + the other shades of green to it)
2) Create Clipping mask from the Selection (I actually have all the green backround on white and nothing else on the screen, but I am kind of stuck at this point)
|
|
|
|
|
 |
thehermit
Joined: 05 Mar 2003
Posts: 3987
Location: Cheltenham, UK
|
| Posted: Thu Mar 01, 2012 11:06 am Post subject: |
|
|
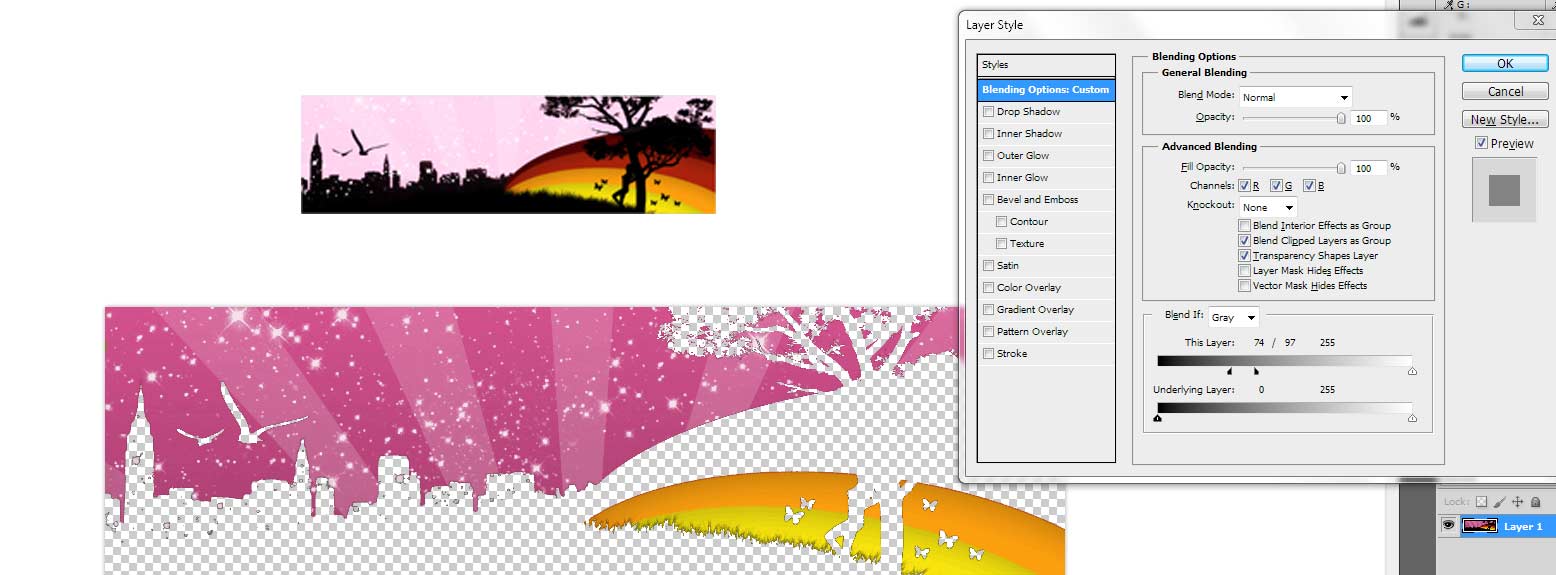
Welcome to the forum. I wouldn't over-think it, sample the light pink colour, make a new layer and set the blend mode to hue and simply paint over the green.
You can get a nice effect also by painting over the whole top section in pink and changing the layer blend mode to hard light
| Description: |
|
| Filesize: |
2.47 KB |
| Viewed: |
644 Time(s) |

|
| Description: |
|
| Filesize: |
5 KB |
| Viewed: |
647 Time(s) |

|
_________________
If life serves you lemons, make lemonade! |
|
|
|
|
|
jtt89
Joined: 01 Mar 2012
Posts: 11
|
| Posted: Thu Mar 01, 2012 11:17 am Post subject: |
|
|
It looks like it is working, but the colors are a little to dark. Thats how it looks right now:
http://belerosemedia.com/
The best bet would probably be to blend the stripes that are on the edges of the picture with the color of the header background and make the other ones darker (inverse the brightness value, or whatever), just like the stripes on the left and right, below the header. I would ultimately want to have exactly the same colors (as fear as hex values), I think.
|
|
|
|
|
|
thehermit
Joined: 05 Mar 2003
Posts: 3987
Location: Cheltenham, UK
|
|
|
|
|
|
jtt89
Joined: 01 Mar 2012
Posts: 11
|
| Posted: Thu Mar 01, 2012 4:26 pm Post subject: |
|
|
Thanks a lot for looking at it. I was actually thinking that since I was able to check the values for the green colors on the sky, I should be able to calculate the pink color (somehow) that I would be using to paint on the Hue layer, to get what I want.
Last edited by jtt89 on Thu Mar 01, 2012 6:35 pm; edited 1 time in total |
|
|
|
|
|
jerryb4417
Joined: 20 Dec 2008
Posts: 710
Location: Oklahoma
PS Version: photoshop cs5
OS: win7 pro 64 bit, i7-3.2g, GTS 450,
|
| Posted: Thu Mar 01, 2012 5:11 pm Post subject: |
|
|
hi,
i am just curious.... and i am not quite sure of trying to follow everything...
but going back to where you have just the greens selected ...
why not just add either a hue and saturation layer where you can slide the the color you want... or create a gradient map of the color you want to the green selection ...
|
|
|
|
|
|
jtt89
Joined: 01 Mar 2012
Posts: 11
|
| Posted: Thu Mar 01, 2012 5:25 pm Post subject: |
|
|
| jerryb4417 wrote: | hi,
i am just curious.... and i am not quite sure of trying to follow everything...
but going back to where you have just the greens selected ...
why not just add either a hue and saturation layer where you can slide the the color you want... or create a gradient map of the color you want to the green selection ... |
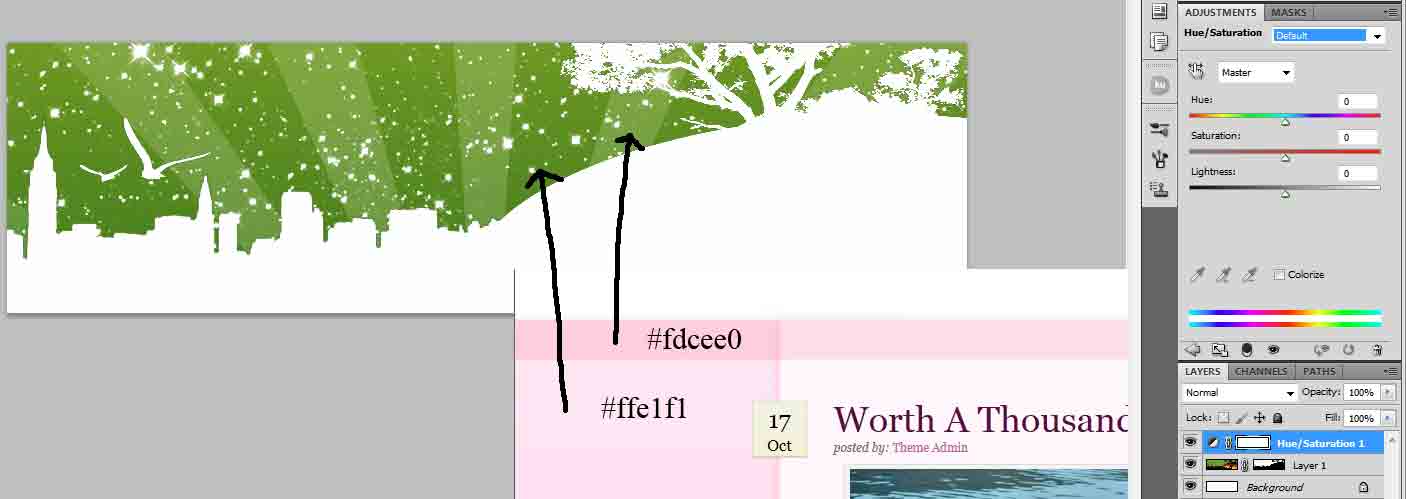
I just did what you said, and it is kind of hard to get the right colors with Hue / Saturation and Brightness.
I think it should not be hard to change the colors, once the heaven is extracted from the picture, I am wondering though if there is a way to change the dark green and light green separate from each other, and also set them to exact hex values of #fdcee0 (dark) and ffe1f1 (light)
EDIT: There is ->Image -> Adjustments -> Replace Color, which sounds like it should "do the job", but I am not sure if this one can be used here (there is also a Color Picker, + Color Picker etc, so if it would be working, it would be perfect for this)
| Description: |
|
| Filesize: |
34.61 KB |
| Viewed: |
582 Time(s) |
|
|
|
|
|
|
|
jtt89
Joined: 01 Mar 2012
Posts: 11
|
| Posted: Fri Mar 02, 2012 10:01 am Post subject: |
|
|
The best way to do this one (or at least what I came up with) was to
1) Extract the sky with Color Range and adjust Fuzziness (in a Quick Mask mode), then Layer mask
2) Select specific areas one by one with a Polygonal Lasso (I was particular about selecting pixels etc to make it loook good) - that way lines that I am gonna be painting on remain straight etc
3) Painting selected areas with the color that I was looking for
4) Just repeating the steps for all the areas
5) I, by intuition, created a Smart object out of the painted sky
6) Then selected the original picture layer and the heaven layer and just used a Layer Mask again to mix the new heaven with the original picture
So, basically the best way to get the colors is just to use the brush tool on the sky. I lost some detail, but I think it looks even better the way it is now.
Thanks.
| Description: |
|
| Filesize: |
12.63 KB |
| Viewed: |
554 Time(s) |

|
|
|
|
|
|
|
thehermit
Joined: 05 Mar 2003
Posts: 3987
Location: Cheltenham, UK
|
| Posted: Fri Mar 02, 2012 10:34 am Post subject: |
|
|
I'm no authority, but I think you did a great job  I suppose the thing is with Photoshop it doesn't matter how you get there, so long as the right results are achieved. I suppose the thing is with Photoshop it doesn't matter how you get there, so long as the right results are achieved.
_________________
If life serves you lemons, make lemonade! |
|
|
|
|
|
jtt89
Joined: 01 Mar 2012
Posts: 11
|
| Posted: Fri Mar 02, 2012 4:50 pm Post subject: |
|
|
Can you tell me what was your method of doing this? I see that you were able to preserve the stars on the sky, maybe that would look a little better...
From what I've been trying the best option that I found was "Selective Color" in Layers Adjustments Panel, but this was still based on making changes by hand etc...
|
|
|
|
|
|
|