|
|
| Author |
Message |
Stealthboy50
Joined: 04 Jul 2009
Posts: 11
|
 Posted: Thu Jul 23, 2009 6:00 pm Post subject: How to Make a Good Grunge Signature Posted: Thu Jul 23, 2009 6:00 pm Post subject: How to Make a Good Grunge Signature |
 |
|
Most people, starting out with signatures, can never get the right look on their render, nor their background. Here is a very simple step by step guide to making a good grunge signature.
Step 1. Get some good brushes.
Before you start, always get some good grunge brushes, at a site like deviantART. You really do need some good ones. Download any brushes that strike your fancy.
Step 2. Create a new document, about 400x200 in size and make sure it's black. Now press CTRL+SHIFT+N to make a new layer. Get your grunge brushes out and select the color #FFCC3C. Now, I am using an abstract set by MetalCX, because abstract brushes can be used for a grunge effect. If you have done it all right, you will get something like this:
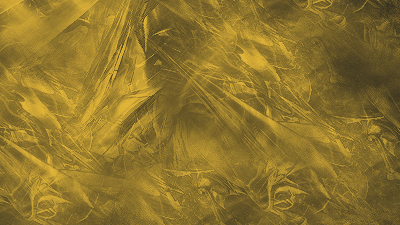
Remember, keep swapping brushes and only click once - that way it looks much better.
Step 3. At the moment, it looks nothing like the gold effect you want. But, here is a simple trick that will make it look golden. Go to Layer > New Adjustment Layer > Brightness/Contrast and put the contrast to 73%. Put the brightness down a little bit and experiment with it. The most I would go to is about 20%. For mine, I am using 14% .
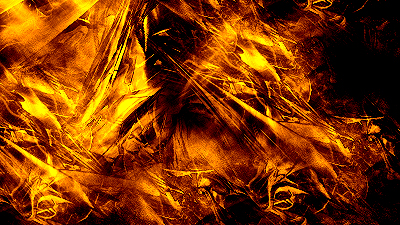
Step 4. We have a very, very nice background. But, a signature is nothing without a render. Once you have the render that you would like, open it in Photoshop and copy it. You should have something like this without the render:
Step 5. Resize the render, hold shift and drag it diagonally - this keeps it in scale and stops it from getting squashed. I would leave it quite big.
Step 6. Here's a big problem: the render looks like someone has glued it on and it does not blend in well. Here is how to make it fit in. But, let's first take a look at what you might have before:
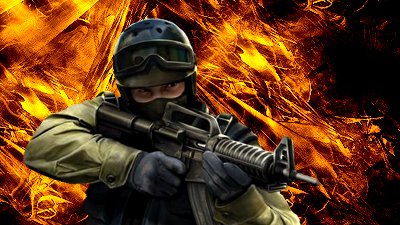
Take a good look at this image and compare it to the after image below.
Step 7. Take a soft eraser and have it on opacity of 35%. Go around the outside of the render with it. Take the sharpen tool, put it on 50% strength and go over the render ONCE. Finally, take the burn tool and go over the render. This is what I have now:
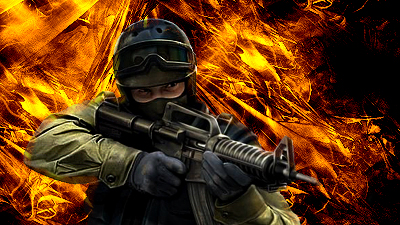
Looking at it here, it looks a lot better.
Step 8. Now for the final stage.
Add your name, in any font you want. Find a good tutorial for fonts and add it. But, you need a cool quote, right? Such as...
"Don't look conspicuous: it draws fire."
"Teamwork is essential. It gives the enemy someone else to shoot at."
"When in doubt empty the magazine."
Just something nice to add to your signature. Personally adding a quote to a signature adds more than anything else.
I hope you liked the tutorial. Thanks for reading. Please comment (PLEASE). |
|
|
|
|
 |
Patrick
Administrator

Joined: 14 Feb 2003
Posts: 11945
Location: Harbinger, NC, U.S.A.
|
| Posted: Thu Jul 23, 2009 6:53 pm Post subject: |
|
|
|
|
|
|
|
|
Matt
VIP

Joined: 24 Sep 2007
Posts: 3515
Location: Haverhill, UK
PS Version: Lightroom 5, CS4 & Elements 11
OS: Windows 8.1
|
| Posted: Fri Jul 24, 2009 11:35 am Post subject: |
|
|
|
|
|
|
|
|
THEMASK
Joined: 18 Oct 2009
Posts: 4
|
| Posted: Sun Oct 18, 2009 12:09 pm Post subject: |
|
|
|
|
|
|
|
|
ElPires
Joined: 28 Sep 2012
Posts: 4
Location: Coimbra, Portugal.
|
| Posted: Fri Sep 28, 2012 4:42 pm Post subject: |
|
|
Nice tutorial mate.
Appreciated. |
|
|
|
|
|
cybapirate
Joined: 10 Feb 2013
Posts: 7
|
| Posted: Sun Feb 10, 2013 5:29 pm Post subject: |
|
|
WOW nice tutorial bro many thanks wanted to start getting into doing signatures thanks 
_________________
Live for the moment |
|
|
|
|
|
|


