|
|
| Author |
Message |
DaleRobinson
Joined: 15 Oct 2014
Posts: 1
Location: United Kingdom
|
 Posted: Wed Oct 15, 2014 5:08 pm Post subject: What is the name of this effect?! Posted: Wed Oct 15, 2014 5:08 pm Post subject: What is the name of this effect?! |
 |
|
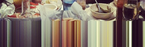
Attached image, really want to know the name so I can find more photos and learn how to do it myself. Many thanks![/img]
| Description: |
|
| Filesize: |
12.13 KB |
| Viewed: |
533 Time(s) |
|
|
|
|
|
|
 |
tomas62
Joined: 16 Jun 2012
Posts: 16
|
| Posted: Fri Oct 31, 2014 2:27 am Post subject: |
|
|
Easy, just make a selection which is 1 pixel thin and then stretch it.
|
|
|
|
|
|
PhotoshopKL4060
Joined: 31 Oct 2014
Posts: 13
|
| Posted: Sat Nov 01, 2014 12:13 am Post subject: |
|
|
Its called motion blur. However, as tomas62 mentioned, can be done by selecting one line of pixels then stretching it with ctrl/command+t.
Another way/my way of doing it would be to:
1. Make the image layer into a smart object by right clicking on the layer
2. Go to the 'filter' tab
3. Select Blur --> Motion Blur
4. Now set the angle on 90 or any of your preference
5. Put distance onto full or any of your preference
6. press ok
7. Your screen should be all blurred out. And under your layer thumbnail, there should be a white thumbnail. We call this layer/thumbnail thingy, a mask. Any white on this layer will have effect by the filter-> blur, any black will have no effect.
8. Select the mask layer
9. Select the top half/part you want it not to be blurred with a box tool/ Rectangular marquee tool.
10. Press hotkey D to get your default colours up. Then press X to swap them around so white is your foreground/primary colour and Black is your background/secondary colour.
11. Press Ctrl/Command+backspace/delete to fill selected area with background colour. (I think there was a way to fill with foreground colour but I forgot...)
It should all be done now.
Now, your image was probably done by selecting one line of pixel then stretching it. But I just personally prefer the second way due to its diversity. You can edit the mask to any degree, you can even put gradients to it. You can also edit the amount of blur.
Anyways. I hope you got my explanation. Have a good day 
|
|
|
|
|
|
|


