|
|
| Author |
Message |
Arthurrich
Joined: 21 Oct 2009
Posts: 8
Location: England
|
 Posted: Wed Oct 21, 2009 10:55 am Post subject: Product Photography - How do you do this? Posted: Wed Oct 21, 2009 10:55 am Post subject: Product Photography - How do you do this? |
 |
|
Hi ladies and gentlemen,
I am new to the forum so apologies in advance if this has been covered (I couldn't see it exactly) but I am taking some photos for a friend and cannot get the desired finish. I include an image of what he is looking for.
I am shooting in a light tent and have got part of they way by cutting multiple single shots out, but stitching them with photomerge does not seem to work because they are so similar they just overlay and when I manually seperate them they have to far apart. I am using Photoshop CS3 Extended.
Less important is creating the sheen layer with reflection running down the lefthandside, but I'd love to know how that is done,
All help greatfully received,
A
| Description: |
|
| Filesize: |
105.43 KB |
| Viewed: |
493 Time(s) |

|
_________________
Buy land, they ain't building it anymore. |
|
|
|
|
 |
hawkeye
Joined: 14 May 2009
Posts: 2377
Location: Mesa, Az
OS: Windows 7 Pro 64 bit
|
| Posted: Wed Oct 21, 2009 11:38 am Post subject: |
|
|
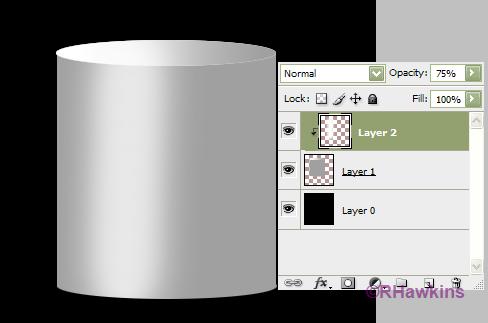
Make a blank layer above the image. Use a soft white brush to create the highlight and clip the layer so it only highlights the can. Adjust the opacity of the layer as required.
| Description: |
|
| Filesize: |
14.46 KB |
| Viewed: |
484 Time(s) |
|
|
|
|
|
|
|
hawkeye
Joined: 14 May 2009
Posts: 2377
Location: Mesa, Az
OS: Windows 7 Pro 64 bit
|
| Posted: Wed Oct 21, 2009 11:51 am Post subject: |
|
|
To the first part of your question: Your best bet would be to create a blank image large enough to hold all the items. Larger is good, as you can crop later.
Select each individual item, then copy and paste it to the blank image. Each will be on it's own layer so you can use the move tool to place them anywhere you like.
|
|
|
|
|
|
Arthurrich
Joined: 21 Oct 2009
Posts: 8
Location: England
|
| Posted: Thu Oct 22, 2009 10:24 am Post subject: Thanks, still working on reflections for cylinders |
|
|
Thanks for the ultra speedy response Hawkeye master. I have done something half decent, but am still working on the cylinder reflections. Everyone I know is stumped, any thoughts?
A
_________________
Buy land, they ain't building it anymore. |
|
|
|
|
|
hawkeye
Joined: 14 May 2009
Posts: 2377
Location: Mesa, Az
OS: Windows 7 Pro 64 bit
|
| Posted: Thu Oct 22, 2009 10:56 am Post subject: |
|
|
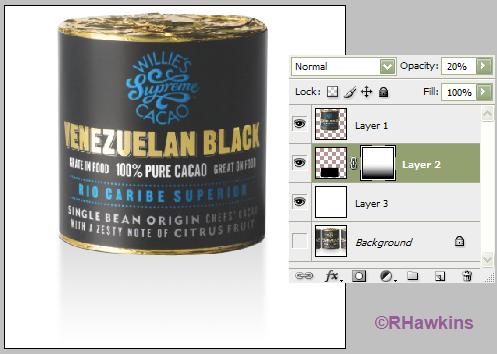
For the shadow. On a new layer (below the can) make a rectangle and fill it with black, give a slight gaussien blur and lower the opacity. Add a layer mask with a gradient so that the shadow fades out towards the bottom.
| Description: |
|
| Filesize: |
27.83 KB |
| Viewed: |
462 Time(s) |
|
|
|
|
|
|
|
Arthurrich
Joined: 21 Oct 2009
Posts: 8
Location: England
|
| Posted: Thu Oct 22, 2009 4:11 pm Post subject: Genius |
|
|
Dear Hawkeye,
I am humbled by your speedsome genius. I have almost cracked it, just got discolouration of bottom of cylinder from the shadow...(Sorry, I am a still learning),
Thanks
A
_________________
Buy land, they ain't building it anymore. |
|
|
|
|
|
Arthurrich
Joined: 21 Oct 2009
Posts: 8
Location: England
|
| Posted: Fri Oct 23, 2009 3:39 am Post subject: Warp tool |
|
|
The warp tool works quite well for bending the shadow/reflection layer to the bottom of the cylinder.
A
_________________
Buy land, they ain't building it anymore. |
|
|
|
|
|
|


